 bluename
 How to Care for Pinguicula During Dormancy Break: A Grower’s Step-by-Step Guide
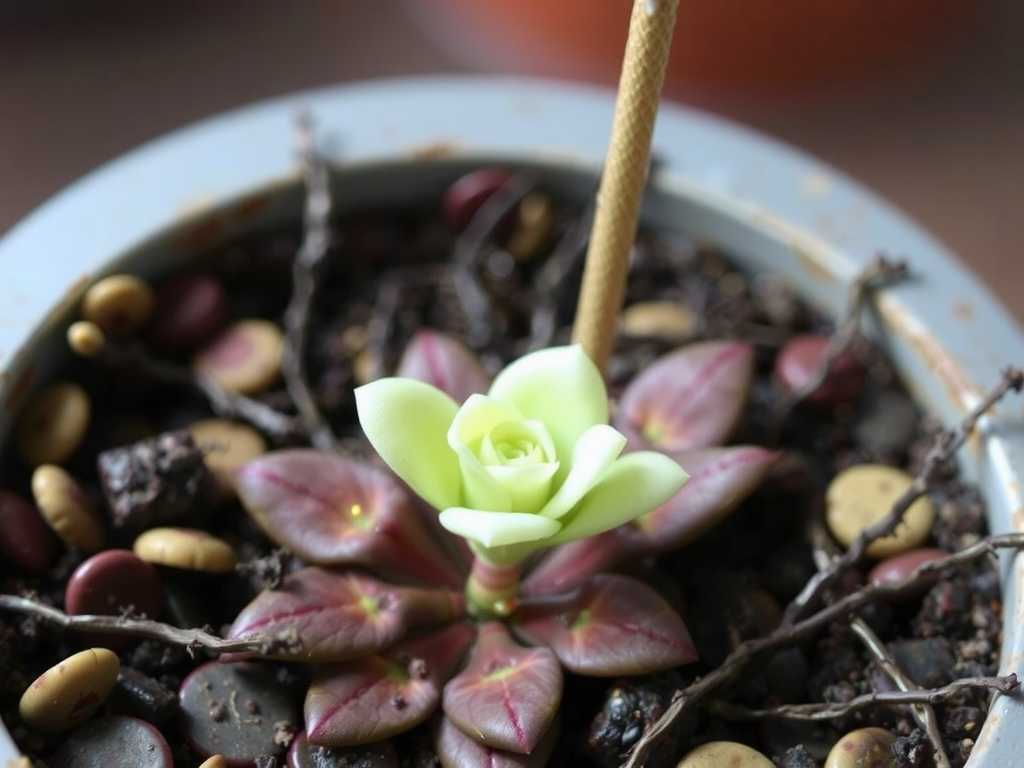
If you’ve ever watched your beloved Pinguicula (butterwort) shrink, change form, or seemingly stall as winter fades, you know the anxiety. The dormancy break period is the most delicate, make-or-break phase for these carnivorous wonders. Get it wrong, and you risk rot, stunted growth, or losing the plant entirely. I’ve been there, staring at a tight, succulent-like rosette in early spring, paralyzed by questions: When do I water? How much light is too much? Is it even alive? After years of trial, error, and meticulous note-taking, I’ve refined a reliable, hands-on method. This guide isn’t just theory; it’s the exact two-week protocol I follow every spring, born from both success and failure.
Understanding the Dormancy Break Signal
First, let’s define our Pinguicula dormancy care focus. Temperate and many Mexican Pinguicula enter a rest period, often forming a tight, non-carnivorous “succulent” rosette. Dormancy break is the transition out of this state, triggered by longer, warmer days. The plant isn’t instantly active; it’s vulnerable, like waking from a deep sleep. According to experts from the International Carnivorous Plant Society (ICPS), mismanaging water and light during this window is the leading cause of springtime loss. The Royal Horticultural Society (RHS) also emphasizes that a gradual reintroduction to growing conditions is paramount for building resilient, flowering specimens. Your goal isn’t to shock it awake, but to gently support its natural rhythm.
My Two-Week Reactivation Protocol: A Daily Log
This isn’t a one-day event. I treat it as a 14-day careful observation and adjustment period. I’ll detail my process using my Pinguicula ‘Sethos’ as a real-world example.
Week 1: The Gentle Awakening
The trigger for me is always environmental, not calendar-based. When my grow lights automatically extend to 13 hours daily and ambient temps consistently stay above 60°F (15°C) at night, I begin.
- Day 1-3: The First Sip. I inspect the plant. The central bud of my ‘Sethos’ showed the faintest hint of expansion—a tiny promise of green. This is your cue. I prepared a shallow tray with only 0.25 inches of distilled or rainwater. I placed the pot (in my case, a well-draining 50/50 perlite-peat mix) in the tray for just one hour. This provides a brief, bottom-up moisture pulse without saturating the medium. After the hour, I removed the pot from the tray. The surface remained dry to the touch. Light exposure remained at its winter level of moderate brightness (about 12,000 lux).
- Day 4-7: Building Momentum. By day 4, I confirmed a visible, though slight, plumping of the outer leaves. Success! I repeated the one-hour bottom-watering, but this time two days later, on day 6. I also increased light intensity by about 15%, moving the shelf slightly closer to the lights. The key here is incremental change. I made my first major mistake years ago by permanently placing the pot in a water tray at this stage. The still-dormant roots in the cooler bottom of the pot began to rot, leading to a soft, blackened center. I caught it just in time by unpotting, cutting away the rot with a sterile blade, and restarting on bone-dry media. The solution? Always err on the side of underwatering at first.
Week 2: Transition to Active Growth
The second week is where you solidify the transition from dormant to active.
- Day 8-10: Introducing Top Moisture. The new, sticky carnivorous leaves were now clearly emerging from the center. I began a light top-watering, using a syringe to gently moisten the surface inch of the medium around the plant, avoiding the crown. I continued the brief bottom-watering sessions every third day. The plant was now under its full, growing-season light intensity.
- Day 11-14: Establishing Rhythm. By day 14, my ‘Sethos’ had fully rehydrated, with several new carnivorous leaves actively catching fungus gnats. I officially switched to my standard summer watering method: keeping the pot in a shallow, permanent water tray (about 0.5 inches deep). The root system was now actively drinking, eliminating rot risk. The plant was officially “broken” from dormancy and in active growth mode.
Critical Pitfalls and How to Navigate Them
My two-week log shows the ideal path, but problems arise. Here’s what to watch for.
- The “Stalled” Plant: Sometimes, after initial signs, progress halts. If after 10 days there’s no further development, check root zone temperature. The media might still be too cold. I gently placed a seedling heat mat set to 65°F (18°C) underneath the tray (not directly under the pot) for a few hours a day. This subtle warmth often kickstarts root activity.
- Overzealous Feeding: A common urge is to feed the plant as soon as leaves appear sticky. Resist. The plant’s energy is coming from stored reserves and photosynthesis. I once fed a newly awakened plant a diluted fertilizer solution (a practice sometimes used for Mexican varieties), which burned the tender new leaves. Wait until the plant has produced at least 3-4 full-sized, new carnivorous leaves before considering any feeding, and even then, natural prey is best.
- Humidity Swings: Sudden drops in humidity can desiccate new growth. If your indoor air is very dry, a humidity dome or a nearby humidifier can help. However, ensure airflow to prevent fungal issues—I use a small, oscillating fan on low, set across the room.
Optimizing Conditions for Post-Break Success
Once past the two-week window, your care for Pinguicula after dormancy shifts to supporting vigorous growth.
- Light: Provide the brightest light possible without scorching. For my Mexican varieties, this means 14-16 hours under strong LED or fluorescent lights.
- Water: Always use low-mineral water. The permanent tray method works for most during active growth, but ensure pots are never sitting in deep water for types prone to root rot.
- Medium: Keep an eye on your soil mix. Over time, organic components break down. Repotting is best done either just before dormancy or after the plant is fully active, never during the break itself.
Answering Your Top Dormancy Break Questions
My Pinguicula looks dead. How do I know if it’s still dormant? Gently squeeze the central bud. If it’s firm, even if small and tight, it’s alive. A completely mushy or bone-dry, crumbly center likely indicates it’s gone. Patience is key; some breaks can take weeks to show obvious signs.
Can I skip dormancy for my temperate Pinguicula? You can try, but it’s not advisable. Forcing year-round growth often leads to weak, etiolated plants that eventually exhaust themselves and die. They require this rest period for long-term health and flowering, as noted in ICPS cultivation guides.
My plant broke dormancy but isn’t producing sticky leaves. Why? Insufficient light is the most common cause. The plant is growing, but it hasn’t received the signal to invest energy in carnivorous structures. Gradually increase light intensity. Also, ensure you’re using the correct water; high mineral content can prevent dew production.
Waking your Pinguicula is an exercise in attentive patience. It demands that you observe more than you act, responding to subtle cues from the plant itself rather than a rigid schedule. By treating the dormancy break as a gradual, two-week reactivation process—starting with minimal water, increasing light incrementally, and vigilantly avoiding the pitfalls of rot and overcare—you give your plant the strongest possible foundation for a spectacular season of growth. The reward is watching those first dewy leaves emerge, a sure sign of a successful transition managed with understanding and care.





